You will be installing the PrintSF Connector App as a Managed Package running in your Salesforce instance. To help you see the big picture before installing, the key components of the Managed Package are highlighted below and include:
•1 Custom App labeled “PrintSF” in the App picklist
•1 Connected App called "PrintSF Connector", which is a Canvas App
•2 Visual Force pages which call the above Connected Canvas App
•1 Visual Force Tab of “PrintSF” & 2 Custom Object Tabs of "Collateral Orders" & "Mailer History"
•2 Custom Objects of Collateral Order & Mailer History
•2 Custom Buttons of “Send Mail” & “Send Mailers” to expose on Lead, Contact and/or Campaign page(s) on the Mailer History Related List.
•8 Custom Fields on Leads and also on Contacts
•Starter Reports, Custom Report Types & Sample Dashboard
•2 Permission Sets
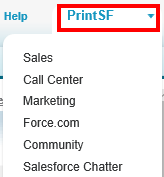
A Custom App named "PrintSF" will be installed and available to enable as an Assigned App for desired Users, accessed from the Salesforce App pick list as below:
1 Connected App called PrintSF Connector is installed which is a Salesforce Canvas App. While invisible to end users, all Salesforce User interaction with the PrintSF site & application routes through this Connected App. Only Users that have the PrintSF Connector configured as an Assigned Connected App (via their User Profiles or an assigned Permission Set) will be able to successfully connect to PrintSF. Note that once installed, the Connected App's oAuth policy must be configured one time before any User can connect to PrintSF.
2 Visual Force pages will be installed which are called by an included Tab or Buttons. These are PrintSF_Landing and PrintSF_Send. These pages use the Connected App to access the appropriate PrintSF wizard or pages. Note that Users accessing PrintSF must be granted permission to access 1 or both of these Visualforce pages via their User Profile or via an assigned Permission Set.
1 Visual Force Tab (PrintSF) and 2 Custom Object Tabs (Collateral Orders & Mailer History) will be installed. The main PrintSF tab calls and displays the broader PrintSF site running seamlessly within Salesforce (shown below). Separately, the 2 Custom Object tabs reference PrintSF's reporting objects into which we sync history data for every Order placed with PrintSF (Collateral Orders) as well as every mail piece delivery or shipment requested through PrintSF (Mailer History). The remainder of the Tabs displayed in our App are Standard Tabs for convenience, including Campaigns, Leads, Contacts & Reports. Note that for Users to see the PrintSF Tabs, one or more of the PrintSF/Collateral Orders/Mailer History Tabs must be set as (i) Available and (ii) Visible.

2 Custom Objects installed with PrintSF are central to setup and configuration which are (1) Collateral Orders and (2) Mailer History. Collateral Orders will house a record for every order placed through PrintSF including Order Name, who placed the order, costs incurred, key dates & status, etc .
Under each Collateral Order, the Child Object of Mailer History will contain a record for every piece of mail or shipment delivery requested within that Order.
An example Collateral Order Detail page is below, inclusive of the child Mailer History Related List at bottom:

Mailer History, while a child of Collateral Orders, plays an outsized role in PrintSF versus your typical child object. Mailer History will contain a record for every piece of mail or shipment requested through PrintSF. Each Mailer History may (but is not required to) relate to a Lead or Contact, and also (optionally) to a Campaign if the mailing was driven from a Salesforce Campaign. Mailer History has lookup relationships to Leads, Contacts & Campaigns and is typically exposed as a Related List on SFDC Lead, Contact and/or Campaign page(s) to show a history of all mailers sent to a given Lead or Contact, or from a specific Campaign.
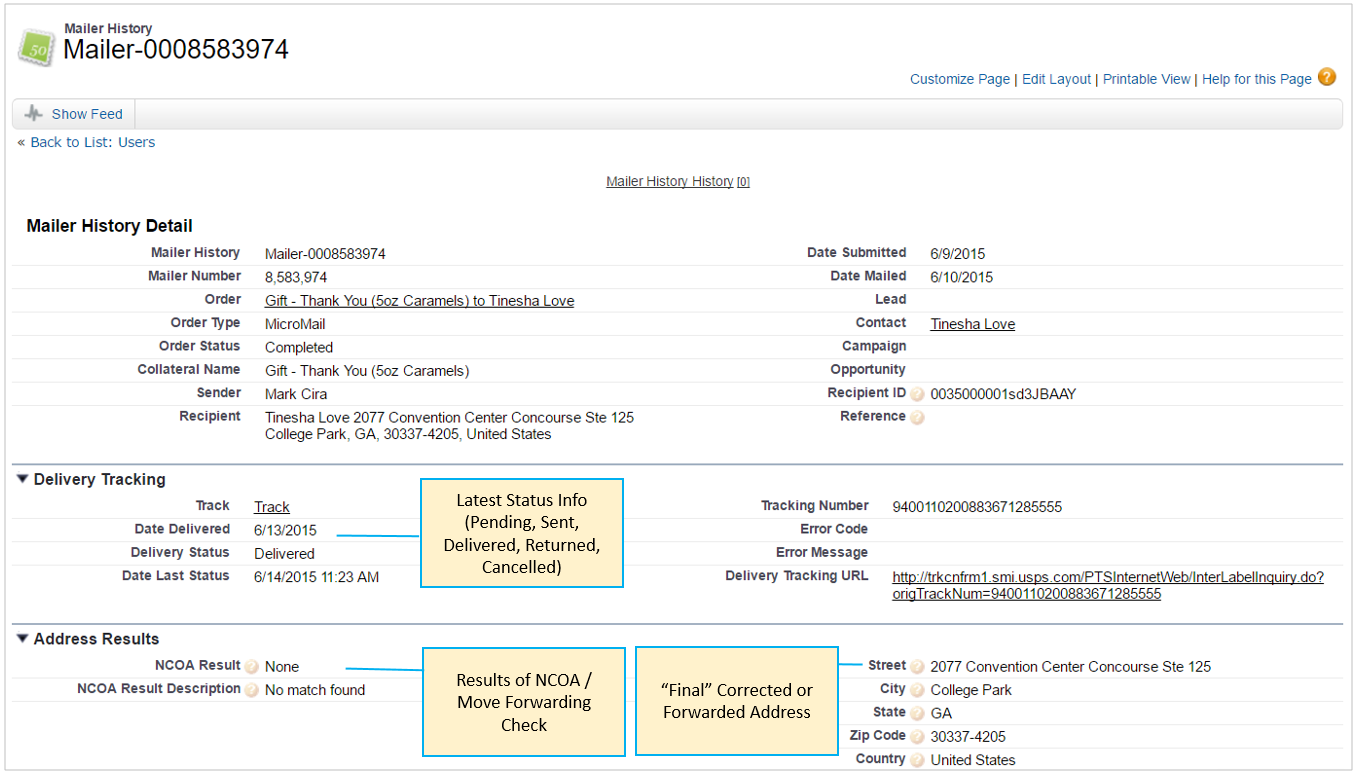
Mailer History is where tracking is recorded on every piece of mail, including date mail sent, delivered and - in some cases - returned, plus results of National Change of Address processing, including results of (a) Move Forwarded, (b) Moved Can't Forward and (c) None (no move on file). Mailer History also contains the final mailed address - which may have been corrected or forwarded during PrintSF/USPS processing versus the original address data passed from SDFC.
Importantly, Mailer History is the key PrintSF object in SFDC which records send and delivery related status changes via our automated sync, and which can in turn drive triggers and automations based on mail being sent, delivered, returned or forwarded. These automations can occur in Salesforce Sales Cloud, or in integrated marketing automation systems like Pardot, Marketing Cloud, Marketo, Act-On, Eloqua and others.
Below shows a Mailer History detail page to provide insight to the fields and data available:
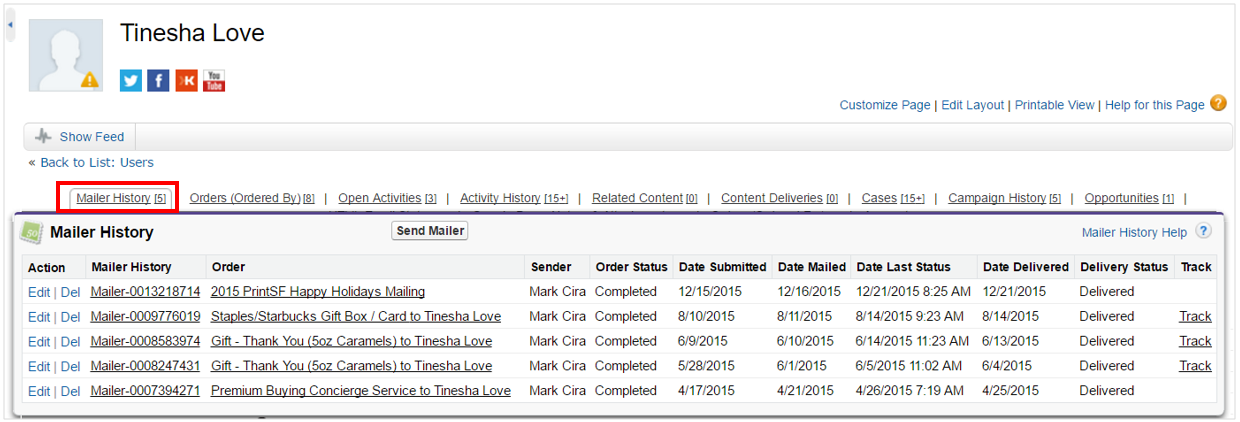
As part of basic configuration, Mailer History is typically exposed as a Related List on Leads, Contacts and/or Campaigns. Shown below is an example from Contacts:
2 Custom buttons will be available to add to the Mailer History Related List under Leads, Contacts and/or Campaigns, and which are used to step into PrintSF direct mail ordering wizards. The buttons are associated with the Mailer History Custom Object and connect Users into PrintSF wizards and page flows for sending 1 mailer at a time from Leads & Contacts ("Solo Mail"), or sending many at a time from Campaigns ("Batch Mail").
The "Send Mailer" button is added to the Lead and/or Contact page(s), and used to step into a wizard to send a single mailer at a time.
![]()
The "Sender Mailers" button is added to the Campaign Page(s), and used to step into a wizard for creating a PrintSF Mail List, and to then send multiple mailers at a time.
![]()
Custom Fields on Leads & Contacts
PrintSF Connector will install 8 custom fields on each of the Lead & Contact objects, and as shown below:

Your organization may choose to add these fields to page layouts or leave them entirely invisible depending on your use case. The fields get populated via optional, add-on Process Flow automations (triggers of sorts) which PrintSF can provide for you to install and configure separately AFTER your basic configuration is complete. In summary, these Process Flows (triggers) monitor the Mailer History object and - when certain data conditions apply - they trigger or "copy up" key fields and status data from the Mailer History record to the referenced Lead or Contact record.
As an example, when a Mailer History's Delivery Status changes to "Delivered", a Process Flow can fire and copy up data to the Lead/Contact record for (i) PrintSF Last Template ID, (ii) PrintSF Last Template Name, (iii) PrintSF Last Mailer Status and (Iv) PrintSF Last Mailer Status Date. Having this data directly on the Lead/Contact objects (versus the related Mailer History record - a Custom Object) empowers you to drive other add on workflows more easily (such as scheduling a follow up call for a Lead Owner).
Similar Process Flows can update the Lead & Contact custom fields when (i) an address fails USPS validation, (ii) when there is a move forward change of address, or (ii) when a mailer gets returned as undeliverable. As one example of the power of these automations, many PrintSF customers save thousands of dollars annually by suppressing Leads & Contacts from future mailings which have automatically been flagged for return mail.
Importantly, these PrintSF Custom Fields directly on the Lead & Contact objects can easily be synched to matching custom fields in your Marketing Automation software (ex: Pardot, Marketing Cloud, Marketo, Act-On, Eloqua, Etc), which can then in turn trigger automations in that system, such as - for example - sending a follow on email 1 day after mail delivery.
To recap, these fields will be installed but will not initially get populated until you implement Process Flows which monitor Mailer History records and copy up data to Leads/Contacts. As you move beyond basic setup, you'll want to consider using these fields to drive automated work flows and journeys within Sales Cloud and within your SFDC integrated marketing automation software.
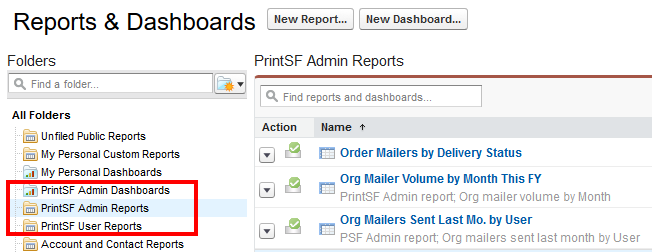
A series of starter Reports and a sample starter Dashboard are installed in 3 folders as shown below. Additionally, 4 Custom Report Types, primarily to enable easy reporting across (i) Users with Collateral Orders and (ii) Users with Collateral Orders & Mailer History.
2 starter Permission Sets of "PrintSF 1-to-1 User" and "PrintSF Full Site User" are installed which may optionally be cloned, modified as needed, and used to grant appropriate permissions to individual Users to access the (1) PrintSF Custom App, (2) Connected App, (3) 2 Visual Force pages, (4) 1 Visual Force Tab, (5) 2 Custom Object Tabs, and (6) to provide Read permissions on the Collateral Order and Mailer History Custom Objects. These Permission Sets should be cloned and customized to your unique use case and PrintSF deployment. Alternatively - rather than use Permission Sets - you may configure the same permissions directly on your desired SFDC User Profiles. See the Manage Permissions section for fuller details and considerations.
